- Summary
- Image analysis and image guided therapy procedures often have fairly complicated workflows
- CTK’s workflow manager and workflow widgets provide a mechanism to construct workflows, display the appropriate user interface for each step, validatee user input and transition appropriately between steps of the workflow
- They use Qt’s state machine implementation, with an additional CTK workflow manager layer
- Workflow classes
- Core workflow functionality (no widgets): ** ctkWorkflowStep: a step in the workflow ** ctkWorkflow: the workflow ** ctkWorkflowTransition: a transition in the workflow
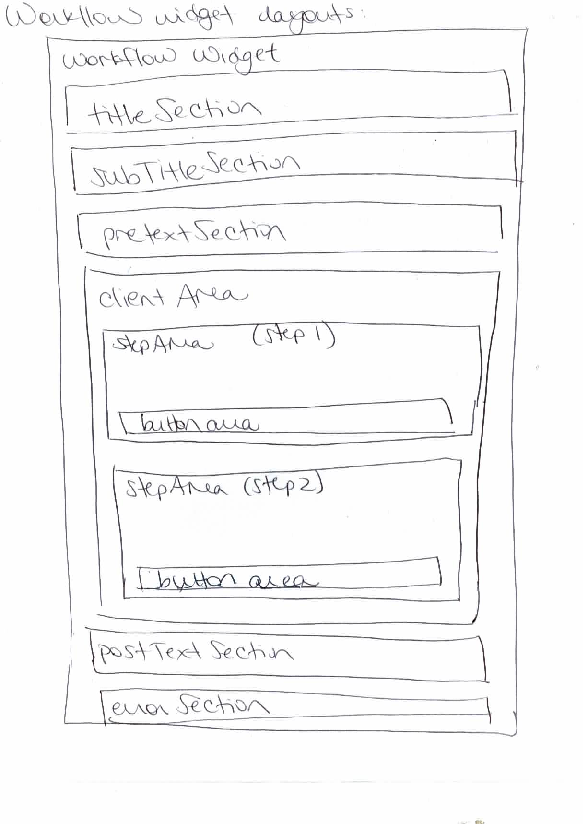
- Workflows associated with widgets: ** ctkWorkflowWidgetStep: a step in the workflow with a user interface ** ctkWorkflowWidget: a workflow with a user interface ** ctkWorkflowStackedWidget: a workflow with a user interface with many pages, based on a QStackedWidget ** ctkWorkflowTabWidget: a workflow with a user interface with many pages, based on a QTabWidget ** ctkWorkflowGroupBox: organizes display of the user interface for a particular step, including a subtitle, pre-text, client area, post-text and error text ** ctkWorkflowButtonBoxWidget: a widget containing “next”, “back” and “jump step” buttons
- To define a new workflow step with a user interface
- Method 1: derive ctkWorkflowWidgetStep: ** Implement validate(): evaluates user input and returns true if valid, false if not. Emits validateComplete(int) when finished. ** Implement entryProcessing(): processing that is done when entering the step. Emits entryProcessingComplete() when finished. ** Implement exitProcessing(): processing that is done when exiting the step. Emits exitProcessingComplete() when finished. ** Either: ** Implement populateStepWidgetsList(QListQWidget stepWidgetsList): add the step’s widgets to the given list; by default they will be displayed vertically in the order in which they were added. Emits populateStepWidgetsListComplete() when finished. *** Implement showUserInterface() and hideUserInterface(): for more control over the step’s UI. Emits showUserInterfaceComplete() and hideUserInterfaceComplete(), respectively, when finished.
-
Method 2: use signals and slots ** Create an object that derives QObject ** Implement slots that mimic the functionality of validate() / entryProcessing() / exitProcessing() / populateStepWidgetsList() / showUserInterface() / hideUserInterface(), and which emit a signal when completed ** Use regular ctkWorkflowWidgetSteps in the workflow, and set their hasXXXCommands (ex. hasValidateCommand) to 1 ** Connect your object’s signals/slots to those of the steps/workflow ** When the workflow runs, it will emit the relevant signals to trigger your QObject’s slots, which will then send indicate completion by the signals they send.
- Examples
- Examples of how to create a custom workflow step: ** Method 1: ctkExampleDerivedWorkflowWidgetStep.h and ctkExampleDerivedWorkflowWidgetStep.cpp: custom step created by deriving ctkWorkflowWidgetStep ** Method 2: ctkExampleWorkflowWidgetStepUsingSignalsAndSlots.h and [hhttps://github.com/commontk/CTK/tree/master/Libs/Widgets/Testing/Cpp/ctkExampleWorkflowWidgetStepUsingSignalsAndSlots.cpp ctkExampleWorkflowWidgetStepUsingSignalsAndSlots.cpp]: custom step created by implementing the step’s functionality in a class derived from QObject, and communicating with the workflow using its signal-slot mechanism
- Examples of how to create a workflow: ** Method 1: ctkExampleUseOfWorkflowWidgetUsingDerivedSteps: builds a simple workflow using custom steps that derive ctkWorkflowWidgetStep ** Method 2: ctkExampleUseOfWorkflowWidgetUsingSignalsAndSlots: builds a simple workflow using custom steps that communicate with the workflow using its signal-slot mechanism
-
Examples of the workflow manager in Slicer 4: ** EM Segmenter module
- Overview of state diagram underlying ctkWorkflow
- Processing step = handles user interaction, and supports additional processing (ex. image processing) as well
- Validation step = evaluates the success of the processing step
-
Currently supported transitions: ** Transition to the next step ** Transition to the previous step ** Transition to a “finish” step ** Equivalent to doing “next, next, next, next…” until you hit the finish step: completes all entry/exit processing associated with each step encountered on the way to the finish step, without showing user interface. ** Success relies on the suitability of the default processing, parameters, etc ** “Blocking” steps, ex. those requiring user interaction, will prohibit success in transitioning to the finish step ** On success: transitions back to the step where the attempt to go to the finish step was initiated, so that the user can perform additional customization from there if needed. *** On failure: remains in the step whose validate() returned failure, and shows its user interface.
- GUI implementation in ctkWorkflowWidget
- workflowWidget-addWidget(QWidget* widget): adds a widget to the clientArea
-
workflowWidget-showWidget(QWidget* widget): shows the clientArea (i.e. for ctkWorkflowStackedWidget and ctkWorkflowTabWidget, ensures that the correct “page” is shownl
- Examples pre ctkworkflow w; ctkWorkflowStep s1(“select_image”); ctkWorkflowStep s2(“input_new_size”); ctkWorkflowStep s3(“display_resized_image”);
w.addTransition(s1, s2); w.addTransition(s2, s3);
/pre
-
Workflow layout
-
Branching workflows pre s3—-s4 “simple” / s0—-s1—-s2
s5—-s6 “advanced” /pre Associated code: pre ctkWorkflow w;
ctkWorkflowStep s0; … ctkWorkflowStep s6;
w.setInitialStep(s0); [Ideally - should be optional]
w.addTransition(s0, s1); w.addTransition(s1, s2); w.addTransition(s2, s3, ctkWorkflow::BiDirectionnal, “simple”); w.addTransition(s3, s4); w.addTransition(s2, s5, ctkWorkflow::BiDirectionnal, “advanced”); w.addTransition(s5, s6); /pre
Conditional branching:
pre [signal] void validationComplete(bool isValid, const QString branchId) /pre
- ctkWorkflow::validate() doesn’t give branchId: ** Single transition: ** transition created without branchId: post transition ** transition created with branchId: post transition
** Multiple transitions: ** *(incorrect usage) transitions created with branchIds: use first transition that was added
- ctkWorkflow::validate() gives branchId: ** Single transition: ** transition created without branchId: post transition *(workflow overrides step) ** transition created with branchId: conditional transition based on match, if no match then stay in current step ** Multiple transitions: ** transitions created with branchIds: conditional transition based on match, if no match then stay in current step